The Loomis Method is one of the most powerful and widely used systems for constructing realistic human heads and bodies. Developed by master illustrator Andrew Loomis, this method has helped generations of artists understand proportion, structure, and three-dimensional form. Whether you are a beginner or an advanced artist, this guide offers a deeply informative explanation of how and why this method works and how you can use it to improve your drawings from any angle.
What Makes the Loomis Method So Effective?
The Loomis Method simplifies the complex shapes of the human figure into basic forms such as spheres, boxes, and cylinders. Instead of copying a subject, you build the head and body step-by-step.
This approach makes it easier to maintain proportion, visualize perspective, and create accurate drawings consistently.
Key Benefits:
- Better control over facial proportions
- Stronger three-dimensional understanding
- Easy to draw the head from any angle
- Ideal for both realism and stylized art
- Perfect for beginners as well as professionals
By focusing on construction rather than guessing, artists gain a practical system they can use for life.
The Loomis Head: A Clear, Structured Breakdown
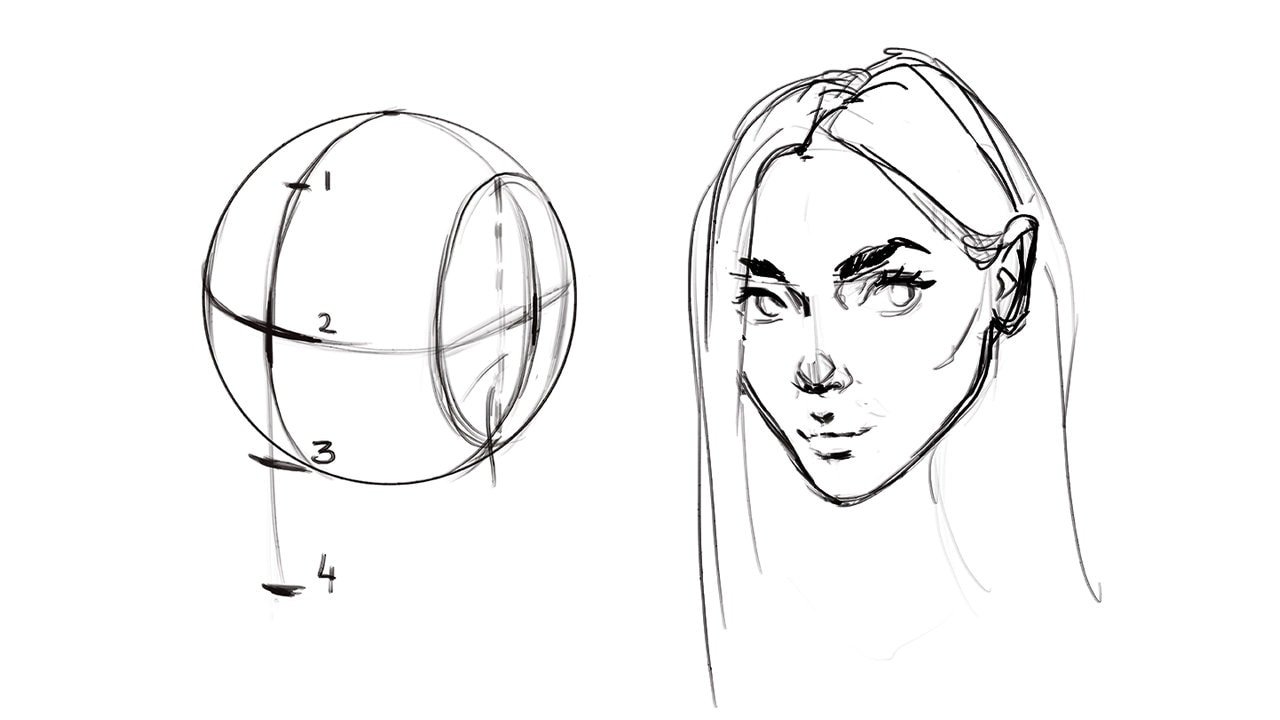
The most famous part of the Loomis Method is the head-construction technique. This process creates a solid foundation for portrait drawing and makes complex angles easier to understand.
1. Begin with a Sphere
The head starts as a simple sphere, symbolizing the cranium.
2. Cut the Side Planes
Loomis removes the sides of the sphere to form flat areas where the ears will sit. This instantly creates direction and volume.
3. Draw the Center Line
A curved vertical line across the sphere shows which direction the head is turning.
4. Add the Brow Line
A horizontal line divides the front of the head into two sections: the forehead and the facial region.
5. Attach the Jaw
A jaw shape is added beneath the sphere to form the lower portion of the face.
6. Place the Features
With guidelines in place, the artist can confidently position the eyes, nose, mouth, and ears.
This balanced method makes it easier to avoid mistakes like crooked features or flat-looking faces.
Full Body Construction Using Loomis Principles
While many know the head method, the full-body construction system is equally valuable. Loomis used an eight-head-tall proportional model to create consistent figures.
Body Landmarks:
- 1 head: Top of head to chin
- 2 heads: Chin to chest
- 3 heads: Chest to navel
- 4 heads: Navel to pelvis
- 5–8 heads: Thighs, knees, shins, and feet
This proportional chart is used worldwide for character design, comics, and realistic art.
Why Beginners Learn Fast with This Method
Beginners often struggle because the human face and body are overwhelming. The Loomis Method removes that frustration by breaking everything down into manageable shapes.
Why it works for beginners:
- Predictable proportions
- A step-by-step process
- Immediate feedback when something is off
- Can be practiced quickly and repeatedly
It builds confidence and forms a strong foundation for future artistic growth.
Why Professionals Still Rely on the Loomis System
Many top illustrators, animators, and concept artists use the Loomis Method even after years of experience. It offers:
- Reliable structure
- Flexibility for different styles
- Accurate results in any perspective
- Faster workflow when drawing from imagination
Even advanced artists return to Loomis construction when dealing with challenging angles and expressive poses.
Using the Loomis Method in Digital Art
This method is extremely effective in digital drawing programs like Procreate, Photoshop, Clip Studio Paint, and more.
You can build the head step-by-step on separate layers:
- Start with a sphere layer
- Add guidelines on a new layer
- Build the jaw
- Add features
- Refine and detail
Digital tools make the process clean and adjustable while maintaining the method’s structural integrity.
Common Mistakes Artists Make
Even though the method is clear, there are a few errors beginners should watch out for:
1. Skipping the Side Planes
Without them, the head loses depth.
2. Flat Center Lines
The line must wrap around the sphere to show direction.
3. Oversized or Undersized Jaw
An incorrect jaw ruins the proportions instantly.
4. Guessing Feature Placement
Use the guidelines — they exist for a reason.
5. Not Practicing Enough
The method improves rapidly with repetition.
How to Practice Effectively
If you want fast improvement, here are the best exercises:
Daily Practice Ideas:
- Draw 10 quick spheres
- Rotate the Loomis head from different angles
- Do 5–10 minute timed studies
- Practice placing features on guidelines
- Draw simplified Loomis mannequins for body structure
Consistent practice leads to fast, noticeable progress.
The Creative Freedom Behind the Method
Some artists think strict construction limits creativity — but the opposite is true.
Once you master structure:
- You can exaggerate features
- Create unique character designs
- Build fantasy or stylized proportions
- Innovate without losing believability
Structure gives you the freedom to experiment confidently.
Conclusion
The Loomis Method is one of the most effective, practical, and time-tested systems for drawing human heads and figures. By breaking complex anatomy into simple shapes, it helps beginners learn quickly and gives professionals a reliable framework for advanced work. If you want your drawings to look accurate, dynamic, and expressive, this method is one of the best tools you can add to your artistic toolkit.
More Details : Ultimate Guide to a Refreshing Lemon Balm Recipe for Wellness
FAQs
1. Is the Loomis Method good for realistic drawing?
Yes, it’s excellent for building realistic structure and proportion.
2. Can I use this method for cartoon or anime styles?
Absolutely — once you know the structure, you can stylize it however you want.
3. Do I need to memorize the eight-head-tall proportion?
It helps, but you can adjust it depending on style or character type.
4. Is the Loomis head hard to learn?
It may feel challenging at first, but with practice it becomes very natural.
5. How long should I practice the method daily?
Even 20 minutes a day can lead to steady improvement.